
Installing Keil uVision5 and Tiva Support
This guide takes a fresh Windows 10/11 PC to the point where Keil uVision5 can build programs for the TM4C123GH6PM and flash them onto the Tiva C LaunchPad (EK-TM4C123GXL). Do it once, at home, before your first lab session. It takes about 30 minutes, most of it downloading.
What you will install
| # | Item | Why you need it | Board needed? |
|---|---|---|---|
| 1 | Keil MDK (uVision5) | The IDE, assembler, compiler and simulator | No |
| 2 | TM4C device pack | Teaches Keil about the TM4C123GH6PM chip | No |
| 3 | Stellaris ICDI add-on | Lets Keil talk to the LaunchPad's on-board debugger | No |
| 4 | Stellaris ICDI USB drivers | Lets Windows recognise the LaunchPad | Yes |
Experiments 1–4 run in the simulator and only need steps 1 and 2. Experiments 5–10 need all four.
Windows only
Keil uVision5 runs on Windows. On a Mac, use a Windows virtual machine (Parallels, UTM or VMware Fusion) or a lab PC.
Step 1: Install Keil MDK
Download the installer
- Open the Keil MDK download page.
- Fill in the form. Any valid email works; for Company write
Birzeit University. - Click the MDK5xx.EXE link (the number changes with each release; take the newest).
Run the installer
- Right-click the downloaded
.EXEand choose Run as administrator. - Accept the licence agreement and click Next.
- Leave the Destination Folders at their defaults and write the Core path down. You will need it in Step 3. It is usually one of:text
C:\Users\<YOUR_USERNAME>\AppData\Local\Keil_v5 C:\Keil_v5 - Enter your name and email on the Customer Information page and click Next.
- When Windows asks whether to install the ULINK / Arm device drivers, click Install.
- Click Finish.
Let the Pack Installer finish
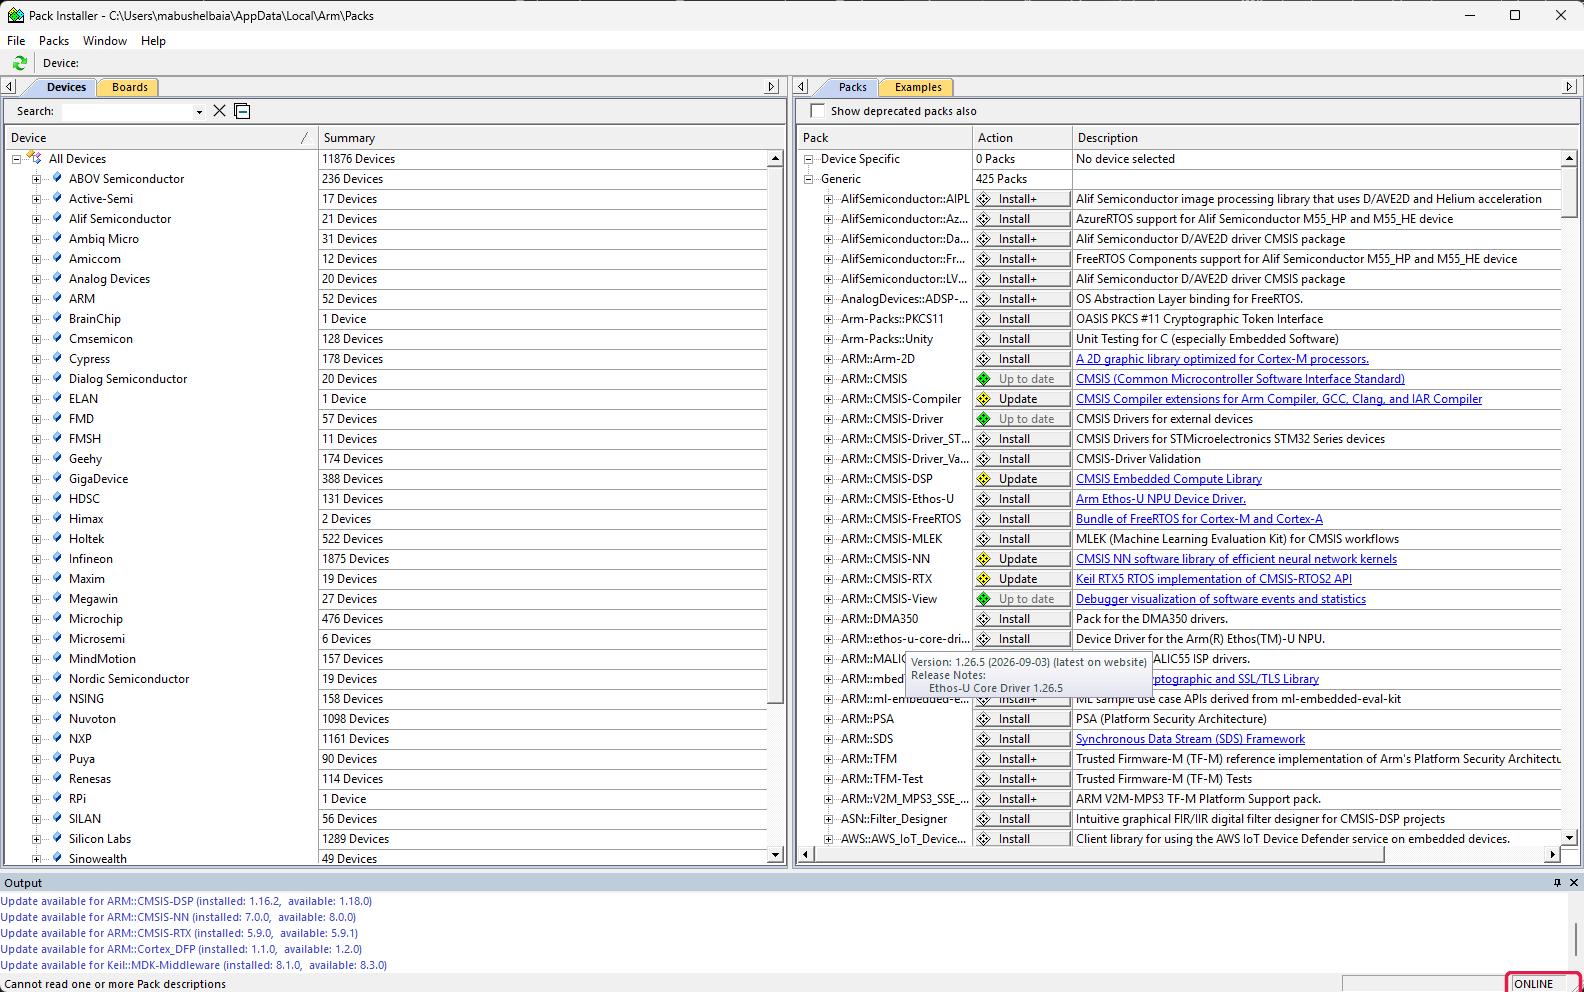
When the installer closes, uVision opens a window called Pack Installer. Its status bar (bottom right) says Updating index…. Wait until it says ONLINE and the progress bar is gone before you close it. This first update can take a few minutes.
About the licence
You do not need to buy anything. Without a licence key, Keil runs as MDK-Lite, which is limited to 32 KB of program code. Every program in this course is far smaller than that. You will see an EVALUATION MODE notice when you start debugging; just click OK.
If uVision asks you to activate a licence, you can activate the free MDK-Community edition from File → License Management, or simply close the dialog and carry on as MDK-Lite.
Step 2: Install the device packs
Keil uses Device Family Packs (DFPs) to describe each chip family. You need two:
- Keil::TM4C_DFP for the TM4C123GH6PM (experiments 5–10).
- ARM::Cortex_DFP for the generic Cortex-M4 simulator target (experiments 1–4). Most Keil installs include it already; check anyway.
Install the TM4C pack
Make sure uVision is closed, then:
- Download Keil.TM4C_DFP.1.1.0.pack.
- Double-click the downloaded
.packfile. The Pack Unzip window opens. - Click Next and wait for it to finish, then click Finish.
Check both packs
- Open uVision5.
- Open Project → Manage → Pack Installer… (or click the Pack Installer icon in the toolbar, a green diamond with a box).
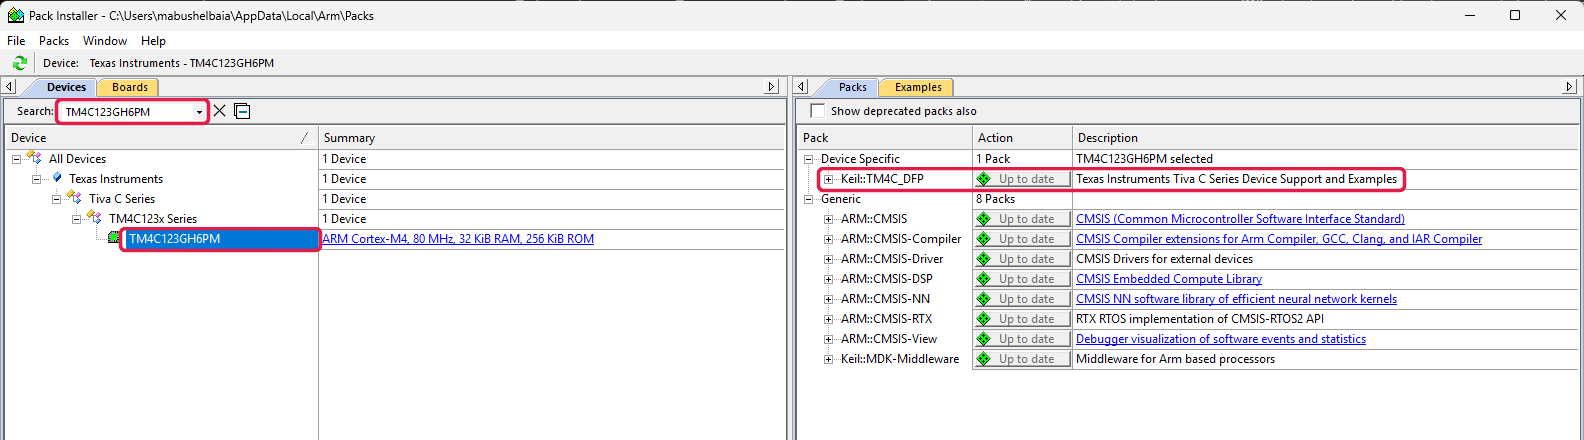
- In the Search box on the left, type
TM4C123GH6PMand select it. On the right, Keil::TM4C_DFP should say Up to date (or Installed). - Clear the search box, type
ARMCM4and select it. ARM::Cortex_DFP should also say Up to date. If it says Install, click it.
Generate the System Viewer file
The debugger's System Viewer (the live GPIO, UART, timer… register windows) reads a compiled .SFR file that sits next to the chip's .svd description. The TM4C pack ships without it and Keil often fails to build it, so in a debug session Peripherals → System Viewer shows only Core Peripherals. Build it yourself once with Keil's SVDConv tool:
- Close uVision.
- Open Command Prompt (press Win, type
cmd, Enter). - Run these two commands:bat
cd /d "%LOCALAPPDATA%\Arm\Packs\Keil\TM4C_DFP\1.1.0\SVD\TM4C123" "%LOCALAPPDATA%\Keil_v5\UV4\SVDConv.exe" TM4C123GH6PM.svd --generate=sfr - It should end with
Found 0 Error(s)(warnings are fine). The folder now has aTM4C123GH6PM.SFRfile next toTM4C123GH6PM.svd.
Keil is in C:\Keil_v5, or "The system cannot find the path specified"
Use your own Core folder from Step 1 for SVDConv.exe, for example "C:\Keil_v5\UV4\SVDConv.exe". On those installs the packs are often under the Core folder too, so the first line becomes cd /d "C:\Keil_v5\ARM\PACK\Keil\TM4C_DFP\1.1.0\SVD\TM4C123". If the pack version isn't 1.1.0, open the TM4C_DFP folder and use the version folder you find there.
Redo this after reinstalling or updating the pack
The .SFR file lives inside the pack folder, so reinstalling Keil or installing a newer TM4C_DFP removes it. If System Viewer goes back to showing only Core Peripherals, run the two commands again.
Step 3: Install the Stellaris ICDI debugger add-on
The LaunchPad has a built-in debugger called the Stellaris ICDI (In-Circuit Debug Interface). Keil does not support it out of the box; Arm provides a small add-on for it.
Download the add-on
- Open the Arm knowledge article for the Stellaris ICDI.
- Scroll down and download
MDK_Stellaris_ICDI_AddOn.exe.
Install it into your Keil folder
- Close uVision.
- Run
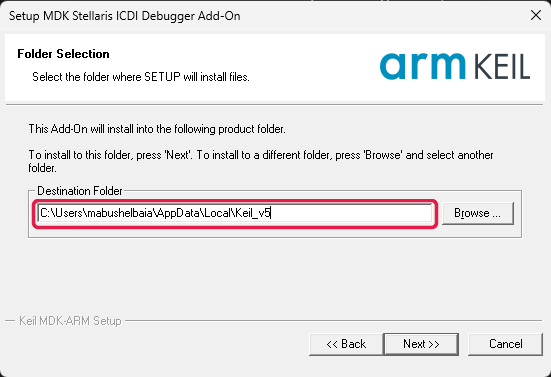
MDK_Stellaris_ICDI_AddOn.exe. - When it asks for the destination folder, change it to the Keil Core folder you wrote down in Step 1, for example
C:\Users\<YOUR_USERNAME>\AppData\Local\Keil_v5. The installer defaults toC:\Keil_v5; if that is not where Keil is, the add-on installs to the wrong place and Stellaris ICDI never appears in Keil. - Click Next until it finishes.
Can't remember the Keil folder?
Right-click the Keil uVision5 shortcut on the desktop → Open file location. If that opens a Start Menu folder full of shortcuts, right-click the shortcut there → Open file location again. You land in ...\Keil_v5\UV4; the folder you want is the parent, ...\Keil_v5.
You will select Stellaris ICDI inside each Tiva project; the Tiva project guide shows where.
Step 4: Install the LaunchPad USB drivers
This step needs the board.
Download the drivers
- Open the Stellaris ICDI drivers page on TI.com.
- Click Download options and download the ZIP file.
- Extract it to a folder you will not delete, such as
C:\TivaDrivers.
Connect the board
- Slide the PWR SELECT switch on the LaunchPad (top-left corner) to DEBUG.
- Plug a micro-USB cable into the DEBUG USB port, which is the one at the top of the board next to the switch, not the one on the side.
- The green power LED turns on. If the board still has TI's demo program, the RGB LED starts fading through colours.
Use a data cable
Some micro-USB cables (especially ones that came with power banks) only carry power. If the board lights up but Windows shows no new devices, try another cable.
Install the driver for each interface
- Press Win + X and choose Device Manager.
- Expand Other devices. You will see In-Circuit Debug Interface listed (usually three times) with a yellow warning triangle.
- For each of them:
- Right-click → Update driver.
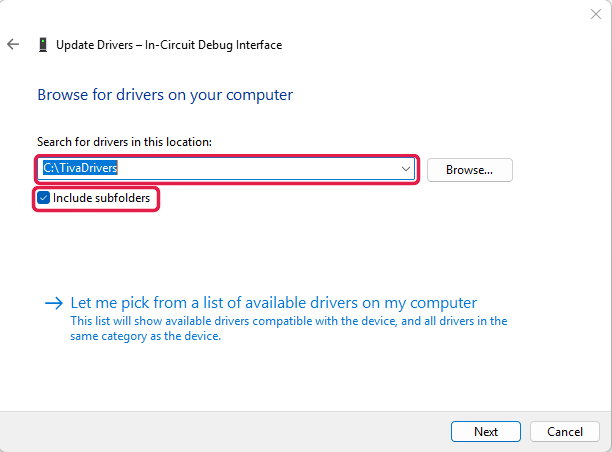
- Choose Browse my computer for drivers.
- Click Browse…, pick the folder you extracted (
C:\TivaDrivers), and make sure Include subfolders is ticked. - Click Next. If Windows warns about the publisher, choose Install this driver software anyway.

Check that it worked
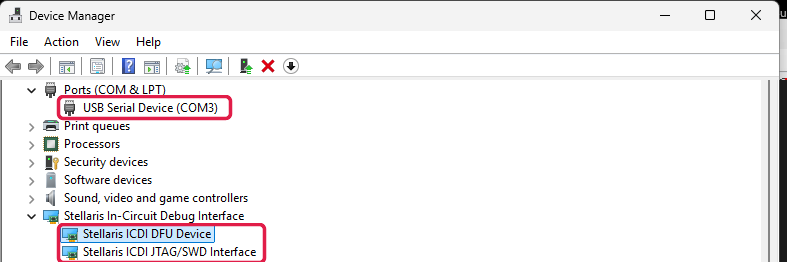
When all three are done, Device Manager should show no warnings for the board, and these entries:
- Stellaris In-Circuit Debug Interface → Stellaris ICDI JTAG/SWD Interface and Stellaris ICDI DFU Device
- Ports (COM & LPT) → Stellaris Virtual Serial Port (COMx). Note the COM number; you will need it for the UART experiment.
You're done. What next?
- For experiments 1–4 (assembly in the simulator): Assembly Project.
- For experiments 5–10 (the LaunchPad): Tiva LaunchPad Project. Its last step is a blinking-LED test that proves the whole chain works, so do it once before your first hardware lab.
Troubleshooting
| Problem | Fix |
|---|---|
Double-clicking the .pack file does nothing | Close uVision and try again. Or install it from inside Keil: Pack Installer → File → Import… → choose the .pack file. |
TM4C123GH6PM does not show up in Pack Installer | The pack is not installed. Repeat Step 2. |
| Stellaris ICDI is not in the Debug tab's list | The add-on went into the wrong folder. Re-run it and set the path to your Keil_v5 folder (Step 3). |
| The board doesn't appear in Device Manager at all | Check the switch is on DEBUG, the cable is in the top port, and the cable carries data. Try another USB port on the PC. |
| Windows says the best drivers are already installed | You picked the wrong device, or Windows installed a generic driver. Right-click the device → Uninstall device, unplug and replug the board, then repeat Step 4. |
Quick reference links
| Tool | Link |
|---|---|
| Keil MDK (uVision5) | Download |
| TM4C Pack (Keil.TM4C_DFP.1.1.0.pack) | Download |
| Stellaris ICDI Debugger Add-on | Keil/Arm guide |
| Stellaris ICDI USB Drivers | TI tool page |